
2016 루비 대림절 특집 - Gem 만들기
2016 루비 대림절
2016년 루비 대림절 글을 작성하게 되었습니다. 무려 2016년 12월 콩일에 작성하게 되어 영광(?)입니다.
앞선 12월 1일에는 아샬님이 루비로 DSL을 구현하는 법을 작성했으며, 다음 12월 3일에는 샤왕자님이 루비 2.4 변경점에 대한 글을 작성했습니다. 모두 훌륭한 글이니 함께 읽어주세요. 다른날에는 어떤 글들이 올라오고 있을까 궁금하신 분들은 2016 루비 대림절 달력을 확인해주세요.
개요
루비를 쓰다보면 정말 많은 gem을 사용하게 된다. 정말 사용하기 편하고 프로젝트 개발 시간도 훨씬 줄여준다. 하지만 가끔씩 내가 원하는 gem이 없을때가 있다. 이럴때는 어쩔 수 없이 직접 작성하거나 혹은 다른 엯촋분들이 작성해주기를 기다릴 수 밖에 없다.
한번 직접 gem을 만들어 보는 것은 어떨까? 펭귄도 이런 망상(?)을 많이 했다. 그리고 우연히 만들게 된 계기가 있어서 직접 어떻게 만들었는지 여기에 공유해본다.
NEW GEM
처음 gem을 만들게 된 계기는 Z사의 코딩 과제였다.
Naver API를 사용해서 좌표는 주소로, 주소는 좌표로 반환 받는 루비 API를 만들어보세요.
사실 rest를 쏘는 코드는 많이 작성해봐서 자신 있었다. 그런데 이거를 그냥 만들기는 너무 심심해서 한번 gem으로 만들어보는 것은 어떨까 생각해봤다. 게다가 마침 소스 사이즈도 얼마 안할 거라는 판단이 들어서 시도해봤다.
우선 예전에 Ruby Mine에서 얼핏 새 gem 만들기를 본 적 있는 거 같아서 New Project.. 를 실행해봤다. 럭키! 정말 있었다.
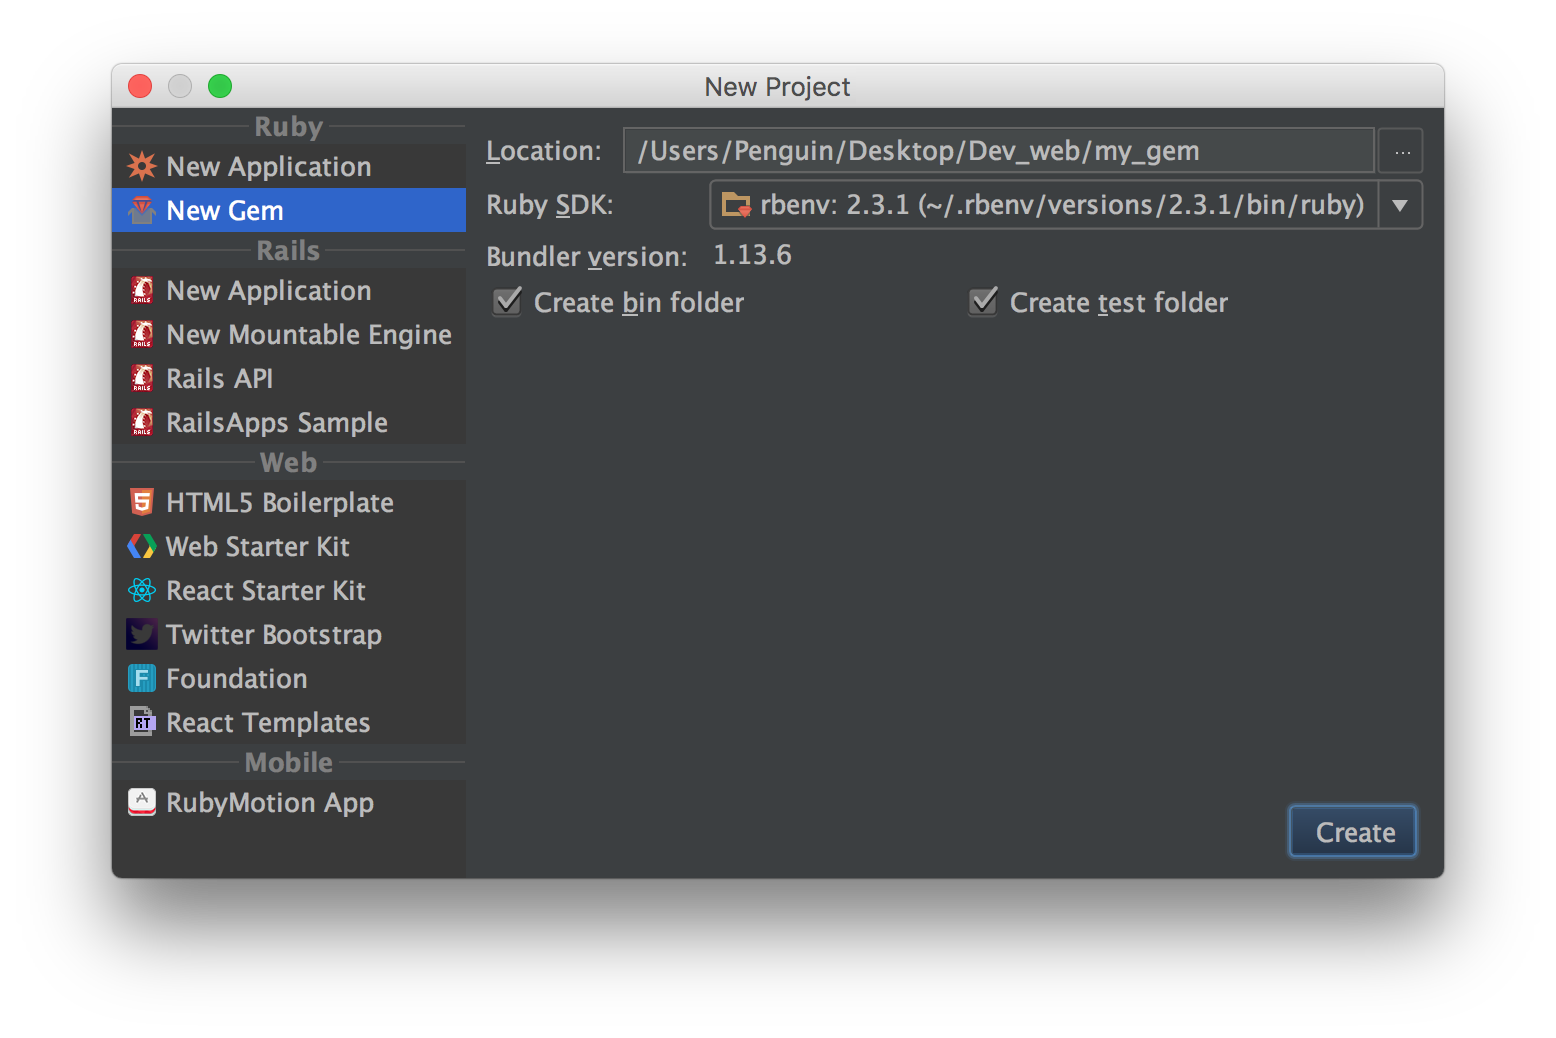
이름, 경로 그리고 루비버전을 설정하고 만들기 했다. 참고로 gem 이름은 소문자로 짓되, 공백은 언더바로 해주면 무난하다. 자세한 짓는 방법은 이 문서를 참고하자.
하지만 생성 이후 계속 bundle process만 돌아가고 어떠한 파일도 생성되지 않았다. 뭔가 잘못됐나 해서 몇 번이고 다시 시도한 끝에 알게되었는데, Ruby Mine 터미널에서 무언가 입력을 기다리고 있었던 것이다. 개발자 이름은 무엇이냐? 라이센스는 무엇이냐? README는 생성할 것이냐? CODE_OF_CONDUCT는 생성할 것이냐? 등등을 묻는데, 전부 적당히 입력하고 y로 통쳐도 상관없다. 참고로 한번 세팅하면 gem을 이후 다시 한번 생성해도 물어보지 않는다. 하지만 개발 과정에서 언제든지 바꿀 수 있는 설정이므로 크게 연연하지 않아도 괜찮다. 세팅을 끝내면 다음과 같은 트리구조가 생성될 것이다.
├── CODE_OF_CONDUCT.md
├── Gemfile
├── LICENSE.txt
├── README.md
├── Rakefile
├── bin
│   ├── console
│   └── setup
├── lib
│   ├── naver_map
│   │   └── version.rb
│   └── naver_map.rb
├── naver_map.gemspec
└── test
gem 정보 입력하기
gem 정보는 gemspec에서 입력한다
우선 우리가 만든 gem의 정보를 입력해주자 naver_map.gemspec이라는 파일이 있을 것이다. 열면 아래와 같은 코드가 나올 것이다.
# coding: utf-8
lib = File.expand_path('../lib', __FILE__)
$LOAD_PATH.unshift(lib) unless $LOAD_PATH.include?(lib)
require 'naver_map/version'

Gem::Specification.new do |spec|
  spec.name          = "naver_map"
  spec.version       = MyGem::VERSION
  spec.authors       = ["Penguin"]
  spec.email         = ["say8425@gmail.com"]

  spec.summary       = %q{TODO: Write a short summary, because Rubygems requires one.}
  spec.description   = %q{TODO: Write a longer description or delete this line.}
  spec.homepage      = "TODO: Put your gem's website or public repo URL here."
  spec.license       = "MIT"

  # Prevent pushing this gem to RubyGems.org. To allow pushes either set the 'allowed_push_host'
  # to allow pushing to a single host or delete this section to allow pushing to any host.
  if spec.respond_to?(:metadata)
    spec.metadata['allowed_push_host'] = "TODO: Set to 'http://mygemserver.com'"
  else
    raise "RubyGems 2.0 or newer is required to protect against " \
      "public gem pushes."
  end

  spec.files         = `git ls-files -z`.split("\x0").reject do |f|
    f.match(%r{^(test|spec|features)/})
  end
  spec.bindir        = "exe"
  spec.executables   = spec.files.grep(%r{^exe/}) { |f| File.basename(f) }
  spec.require_paths = ["lib"]

  spec.add_development_dependency "bundler", "~> 1.13"
  spec.add_development_dependency "rake", "~> 10.0"
end
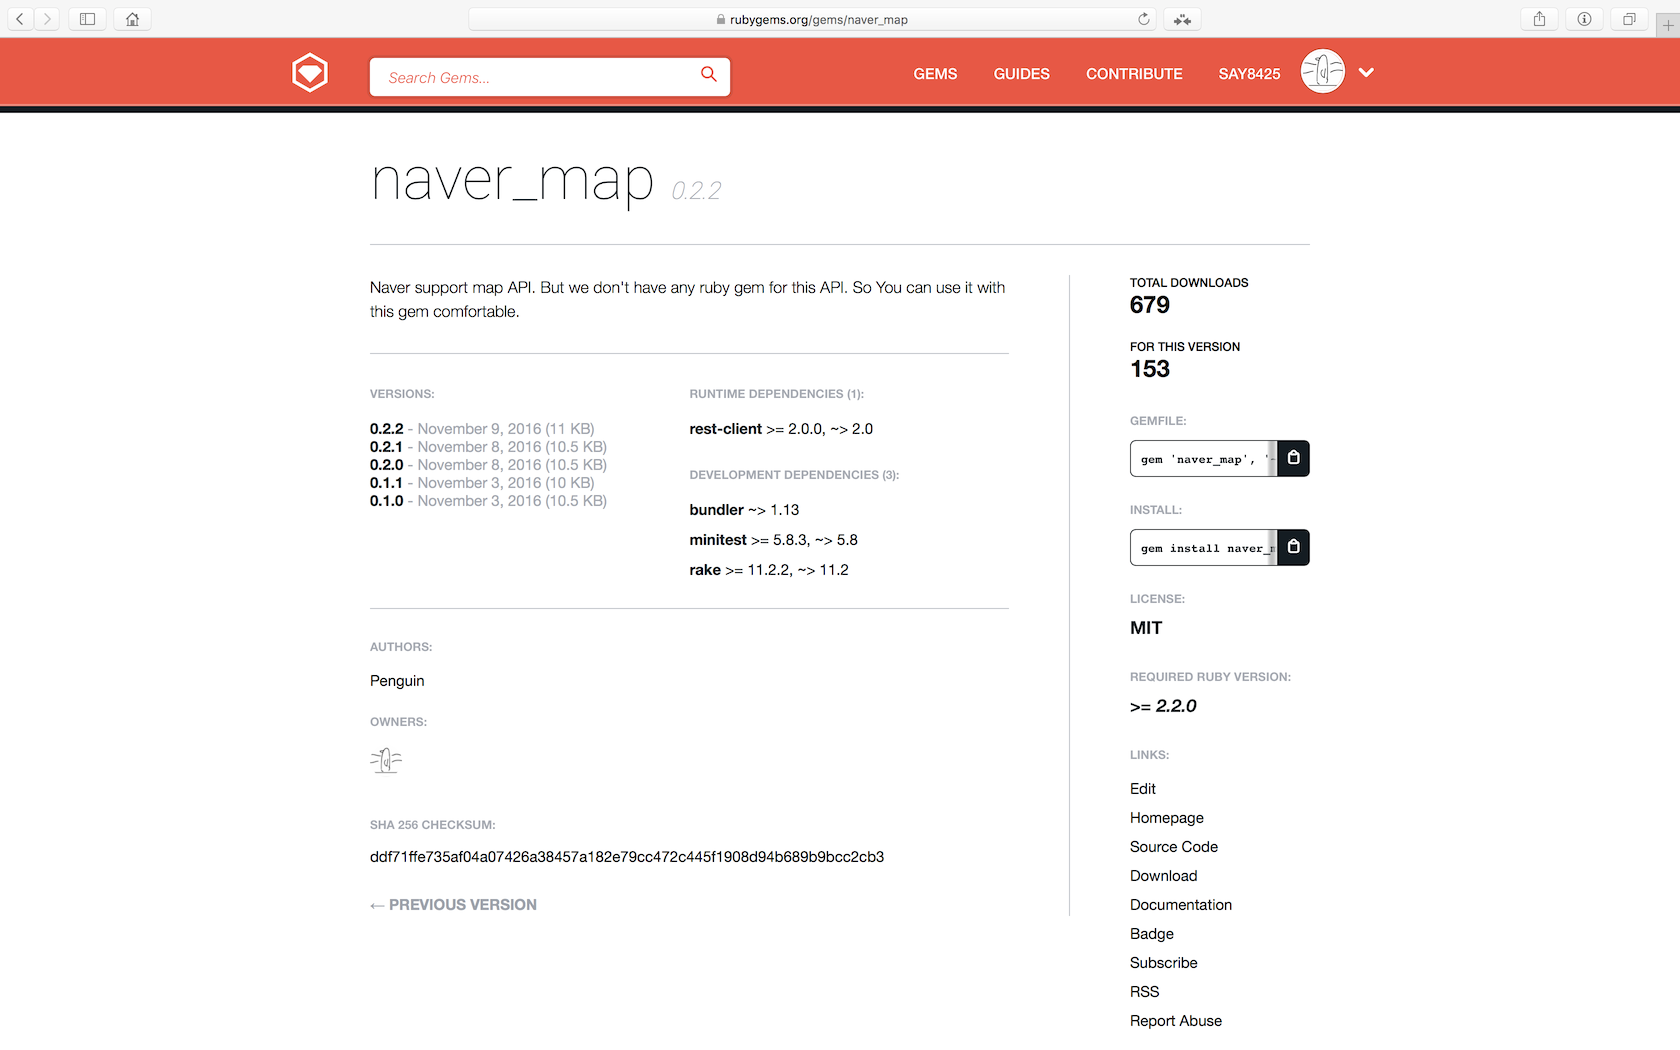
spec 요소에 gem의 정보를 적어주자. 참고로 여기에 작성된 정보는 아래 이미지와 같이 rubygems.org 에 전부 display가 되므로 정확하게 적어주자.
Version
version은 약간 특이하게 되었는데, require 'naver_map/version'를 보고 눈치챘겠지만 따로 Version이라는 클래스에서 받아온다. 따라서 버전을 수정하고 싶다면 naver_map/version 파일을 수정하면 된다. 디폴트가 왜 이렇게 번거로운지 모르겠지만, Version 클래스를 지워버리고 gemspec에 직접 버전을 입력해도 별 문제 없다. 심지어 공식 가이드에서도 gemspec에 버전을 직접 입력하는 방법을 보여주고 있으므로 편한대로 작성하자.
Dependency
다 작성하고 아래를 보면 이런 코드가 있을 것이다.
spec.add_development_dependency "bundler", "~> 1.13"
spec.add_development_dependency "rake", "~> 10.0"
이름에서도 알 수 있듯이, 이 gem에 대한 디펜던시를 선언하는 코드다. rails에서 하듯이 Gemfile에서 직접 선언해도 상관없지만, 공식 가이드에서는 gemspec에서 관리하는 방법을 보여주고 있다. 이는 위에서 봤듯이 디펜던시 또한 rubygem.org 에 display가 되는데, Gemfile에서 선언하면 보여주지를 못한다.
디펜던시를 선언하는 방법은 add_runtime_dependency, add_development_dependency 2가지가 있다. 전자는 gem이 실행되는 데 있어서 필요한 디펜던시이고, 후자는 개발과정에서 필요한 디펜던시이다. 즉 Gemfile의 group :development do end정도에 해당한다. 펭귄은 rest를 쏘는 gem이 필요하므로 rest-client를 추가하겠다.
spec.add_dependency "rest-client", "~> 2.0", ">= 2.0.0"
Ruby version
spec.required_ruby_version = ">= 2.2.0"
안해줘도 상관 없는데, 필요한 루비 최소버전을 보여주고 싶다면 추가해주자. 참고로 이 값을 넣지않으면, 필요한 루비 최소버전은 0.0이상이라고 display된다.
다 작성된 코드는 아래와 같다.
# coding: utf-8
lib = File.expand_path('../lib', __FILE__)
$LOAD_PATH.unshift(lib) unless $LOAD_PATH.include?(lib)
require 'naver_map/version'

Gem::Specification.new do |spec|
  spec.name          = "naver_map"
  spec.version       = NaverMap::VERSION
  spec.author        = ["Penguin"]
  spec.email         = ["say8425@gmail.com"]

  spec.summary       = "Generating Naver map API"
  spec.description   = "Naver support map API. But we don't have any ruby gem for this API.
                        So You can use it with this gem comfortable."
  spec.homepage      = "https://github.com/say8425/naver_map_ruby"
  spec.license       = "MIT"

  # Prevent pushing this gem to RubyGems.org. To allow pushes either set the 'allowed_push_host'
  # to allow pushing to a single host or delete this section to allow pushing to any host.
  if spec.respond_to?(:metadata)
    spec.metadata['allowed_push_host'] = "https://rubygems.org/"
  else
    raise "RubyGems 2.0 or newer is required to protect against " \
      "public gem pushes."
  end

  spec.files         = `git ls-files -z`.split("\x0").reject do |f|
    f.match(%r{^(test|spec|features)/})
  end
  spec.bindir        = "exe"
  spec.executables   = spec.files.grep(%r{^exe/}) { |f| File.basename(f) }
  spec.require_paths = ["lib"]
  spec.required_ruby_version = ">= 2.2.0"

  spec.add_dependency "rest-client", "~> 2.0", ">= 2.0.0"

  spec.add_development_dependency "bundler", "~> 1.13"
  spec.add_development_dependency "rake", "~> 11.2", ">= 11.2.2"
end
코딩하기
본격적인 소스는 lib에서
지겨운 설정은 이쯤에서 마무리 짓고, 이제 직접 코딩해보자. 디렉토리중에서 lib이라고 있을 것이다. gem이 작동하는 코드는 이 디렉토리에 있다. lib/naver_map.rb를 열어보자.
require_relative './naver_map/version'

module MyGem
  # Your code goes here...
end
module 이라는 생소한 블락이 보일 것이다. 이 module은 여러 클래스에서 사용할 수 있는 메소드를 제공하는 블락이다. 하지만 펭귄은 단 하나의 클래스면 충분하므로 이 module을 지우고 class에서 코딩하기로 했다. 코딩은 평소 루비에서 코딩하듯이 하면 된다. 펭귄이 당시 코딩한 초기 소스는 아래와 같았다.
require 'naver_map/version'
require 'rest-client'
require 'json'

class NaverMap
  attr_accessor :client_id, :client_secret

  def initialize(client_id, client_secret)
    @client_id = client_id
    @client_secret = client_secret
  end

  def address_to_coordinates(address)
    begin
      url = 'https://openapi.naver.com/v1/map/geocode'
      response = RestClient.get(url, params: { query: address }, 'X-Naver-Client-Id': @client_id,
                                'X-Naver-Client-Secret': @client_secret)
      result = JSON.parse(response.body, symbolize_names: true)[:result]
      result[:items].map do |element| element[:point] end
    rescue RestClient::ExceptionWithResponse => err
      err.response.body
    end
  end


  def query(address)
    begin
      url = 'https://openapi.naver.com/v1/map/geocode'
      response = RestClient.get(url, params: { query: address }, 'X-Naver-Client-Id': @client_id,
                                'X-Naver-Client-Secret': @client_secret)
      JSON.parse(response.body, symbolize_names: true)[:result]
    rescue RestClient::ExceptionWithResponse => err
      err.response.body
    end
  end

  def to_s
    "Client ID: #{@client_id}, Client Secret: #{@client_secret}"
  end
end
상당히 엉망진창 초기 소스다. 혹시 소스가 화가 난다면 많은 풀리와 이슈 부탁한다. 일단 의도한 바는 NaverMap.new('클라이언트 키', '클라이언트 비밀키')로 객체를 생성하고 이 객체로 좌표나 주소를 받아오는 것이었다. 한번 직접 gem을 설치해서 테스트해보자.
gem 빌드하기
우선 gem을 빌드해야한다. 빌드하려면 터미널에 다음과 같은 명령을 쳐주면 된다.
gem build naver_map.gemspec
Successfully built RubyGem
  Name: naver_map
  Version: 0.1.0
  File: naver_map-0.2.3.gem
그러면 디렉토리에 naver_map-0.1.0.gem이라는 gem이 생성 된 것을 볼 수 있을 것이다. 이 gem을 설치하자. 설치는 평소 하던 명령어와 똑같다.
gem install naver_map-0.1.0
Successfully installed naver_map-0.1.0
Parsing documentation for naver_map-0.1.0
Done installing documentation for naver_map after 0 seconds
1 gem installed
설치가 성공한 것을 확인 할 수 있을 것이다. 이제 gem을 직접 사용해보자.
실행해보기
irb를 실행하자. 그리고 require 'naver_map'이라고 명령하자. true가 반환되면 성공 한 것이다. 그럼 테스트를 해보자.
test = NaverMap.new('클라이언트 키', '클라이언트 비밀키')
=> #<NaverMap:0x007fd2c115b0a8 @client_id="클라이언트 키", @client_secret="클라이언트 시크릿">
test.address_to_coordinates('서울특별시 중구 세종대로 110 서울특별시청')
=> [{:x=>126.9783882, :y=>37.5666103}]
잘된다면 성공한 것이다. 이제 이 gem을 푸시하자.
gem 푸시하기
gem을 푸사하기전에 우선 필요한 것이 있다. 루비젬 계정과 인증서이다. 우선 루비젬에서 계정을 만들자. 그리고 인증서를 다운받자. 인증서를 다운 받는 명령어는 아래와 같다.
$ curl -u 계정명 https://rubygems.org/api/v1/api_key.yaml >
~/.gem/credentials; chmod 0600 ~/.gem/credentials
Enter host password for user '계정명':
명령어를 치면 비밀번호를 입력받을 것이다. 입력해주고 세팅을 마무리해주자. 그러면 gem을 푸시할 준비는 끝났다. 아래 명령어로 gem을 푸시하자.
gem push naver_map-0.1.0.gem
이후 성공했다는 메시지가 뜬다면 성공한 것이다. 이후 gem install로 평범하게 gem 설치하듯이 어디서나 다운 받고 설치 할 수 있다.